

Welcome to our guide on fixing a hole in your air mattress, a familiar yet frustrating issue many of us encounter. There’s nothing quite like the convenience and comfort of an air mattress, especially when it comes to accommodating guests or enjoying a camping trip. However, even the best air mattresses are prone to wear and tear, often resulting in pesky holes that can deflate the bed and our spirits, too!
In this guide, we will walk you through identifying and patching up holes in your air mattress, ensuring that it remains a reliable and comfy part of your household. Whether you’re a seasoned DIY enthusiast or a beginner, our step-by-step instructions and handy tips and tricks will make the repair process a breeze. By the end of this article, you’ll have all the knowledge and confidence needed to tackle air mattress repairs like a pro!
So, let’s dive in and bring your air mattress back to its full, buoyant glory!
Table of contents
Identifying the Hole

Need more detection tips? If you’re having trouble pinpointing the exact leak, check out our comprehensive guide that compares all the effective detection methods in detail:
The Ultimate Guide to Finding Air Mattress Leaks.
Locating a hole in an air mattress can sometimes feel like finding a needle in a haystack. However, with the right approach, this task can be surprisingly straightforward. Here’s how to pinpoint that elusive leak and get one step closer to a fully functional air mattress.
- Inflate the Mattress: Begin by fully inflating your air mattress. Indeed, a fully grown mattress makes the hole more noticeable as the escaping air creates a distinct sound or sensation.
- Listen for the Leak: Slowly press down on the mattress in a quiet room and listen closely. The sound of escaping air often leads you directly to the hole.
- Feel for Airflow: If you can’t hear the leak, use your hands to feel along the surface of the mattress. Please pay close attention to seams and valve areas, as they are common leak sites.
- The Soapy Water Test: Mix a small amount of dish soap with water and apply it to the mattress for a more thorough search. Bubbles will form at the leak site, making it visible. Remember to cover the entire mattress, including the bottom and sides.
- Mark the Spot: Once you find the hole, dry the area and mark it with a piece of tape or a marker. This will ensure you keep the spot when you prepare for the repair.
In conclusion, identifying the hole in your air mattress is the first critical step in the repair process. With patience and a systematic approach, you’ll be well on your way to a fully repaired mattress. Stay tuned for the next section, where we’ll guide you through preparing for the repair process.
Preparation for Repair
Before diving into the actual repair of your air mattress, proper preparation is critical. This makes the repair process smoother and increases the chances of a successful, long-lasting fix. Here’s how to get your air mattress ready for repair:
- Deflate the Mattress: Start by deflating your mattress completely. This reduces tension on the material, making it easier to apply a patch effectively.
- Clean the Area: The success of your patch depends mainly on how well it adheres to the mattress surface. Clean the area around the hole using a damp cloth and mild detergent. Avoid using harsh chemicals as they can damage the material of the mattress. Let the area dry completely before proceeding.
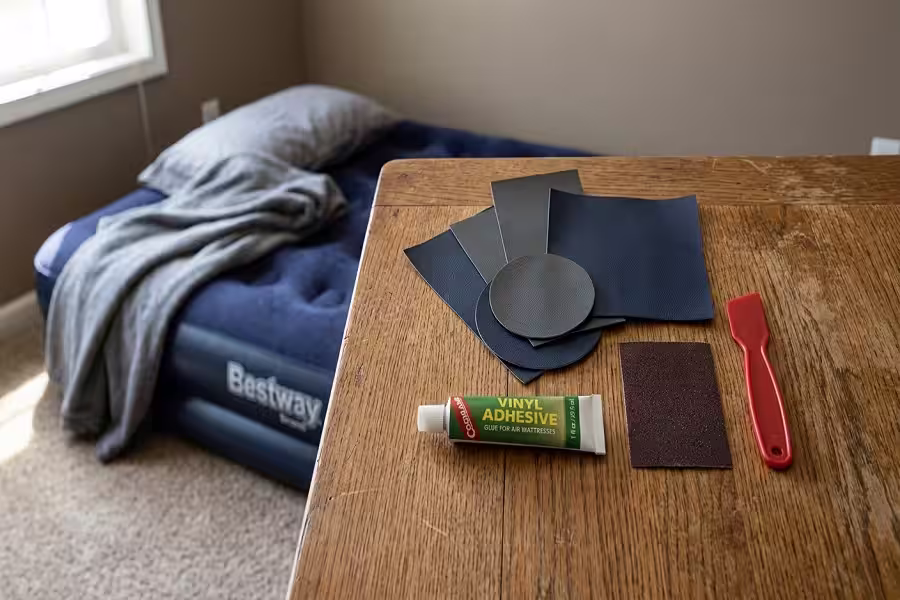
- Gather Your Repair Materials: Depending on the method you choose for patching (which we will cover later), ensure you have all the necessary items. This could include a patch kit for air mattresses, adhesives, and scissors.
- Prepare Your Workspace: Choose a flat, well-lit area to work in. Enough space and good lighting will make the repair process more accessible and accurate.
- Cut the Patch to Size: If you’re using a patch kit, cut the patch to a size that covers the hole adequately. A good rule of thumb is to cut a patch that extends at least an inch around the hole in all directions.
Therefore, with these preparations in place, you’re now ready to tackle the actual patching of your air mattress. The following section will guide you through how you can effectively seal that troublesome leak.
Methods of Patching a Hole
Repairing a hole in an air mattress doesn’t have to be a daunting task. Below is a quick comparison table of the most common patching methods based on their durability, drying time, and effectiveness to help you choose the best fix.
| Patching Method | Durability | Curing Time | Best For |
|---|---|---|---|
| Traditional Patch Kit | ⭐⭐⭐⭐⭐ (Permanent) | 12 – 24 Hours | Large tears and seam leaks |
| Flex Seal / Sealants | ⭐⭐⭐⭐ (Long-lasting) | 2 – 4 Hours | Hard-to-reach areas & seams |
| Super Glue / Hot Glue | ⭐⭐⭐ (Temporary) | 15 – 30 Minutes | Microscopic pinholes only |
| Duct Tape / DIY Patches | ⭐⭐ (Emergency Only) | Instant | Overnight camping emergencies |
Exploring Different Repair Materials
 Here are the detailed insights into the most common and efficient patching methods to clear up any confusion:
- Traditional Patch Kits: These are specifically designed for air mattress repairs and usually include a piece of vinyl material and a tube of adhesive. Patch kits are reliable and offer a strong bond, making them an excellent choice for most repairs.
- DIY Patches: If you don’t have a traditional patch kit, you can create your patch using materials like duct tape, vinyl patches from a pool repair kit, or even a piece of shower curtain. Remember, the key to a successful DIY patch is ensuring the material is sturdy enough to withstand air pressure.
- Best Patching Material: A vinyl patch from a specialized repair kit is the best material for patching an air mattress. These patches are designed to flex with the mattress and provide a robust and air-tight seal.
- Alternative Solutions: In a pinch, household items like adhesive bandages or plastic shipping tape can be used for small holes. However, these are temporary fixes and may not hold up as long as traditional or DIY vinyl patches.
- Commercial Sealants: Products like Flex Seal can be effective for air mattress repairs. They provide a flexible, waterproof seal over the hole. However, using them sparingly and following the product instructions closely is essential.
Consequently, each method has pros and cons, but all can effectively restore your air mattress to its fully functional state. In the following section, we’ll provide detailed instructions on how to apply these patching methods for a successful repair.
Step-by-Step Guide to Patching
Repairing a hole in your air mattress can be straightforward if you follow these detailed steps. Whether using a traditional patch kit or a DIY solution, applying the patch correctly ensures a lasting fix. Here’s how to do it:
- Prepare the Patch and Mattress: If using a traditional patch kit, cut the patch to size, ensuring it covers the hole with at least an inch of extra material around it. Clean the area around the hole on the mattress, as mentioned in the preparation section.
- Apply the Adhesive: If your patch kit comes with an adhesive, apply it generously around the hole and on the patch. Use a strong glue suitable for your mattress’s material for DIY patches. Wait for the adhesive to become tacky – this usually takes a few minutes.
- Place the Patch: Carefully position the patch over the hole and press it down firmly. Start from the centre of the patch and work your way out to the edges to remove any air bubbles and ensure a tight seal.
- Apply Pressure: Use a flat object like a book or a rolling pin to apply even pressure over the patch. This helps create a stronger bond between the patch and the mattress material.
- Allow It to Cure: Let the patch set for the recommended time, ranging from a few hours to overnight, depending on the adhesive used. Avoid inflating the mattress during this curing period.
Testing and Finalizing the Repair
After allowing enough time for the glue to set, it is finally time to check your work. Follow these final steps to ensure your airbed is completely airtight:
- Test the Repair: Once the patch has been set, inflate your mattress and check for air leaks. Apply soapy water around the patch to ensure no bubbles indicate a leak.
- Reapply if Necessary: If the patch doesn’t hold, don’t despair. Sometimes, it takes a couple of attempts to get a perfect seal. Just repeat the process, ensuring the area is clean and the adhesive is applied correctly.
With these steps, you should be able to effectively patch the hole in your air mattress and enjoy a comfortable, leak-free sleep again. Below, we’ll explore some creative and practical tips for air mattress repair, including using products like Flex Seal.
Innovative Solutions and Tips
While traditional patching methods are often effective, there are also innovative solutions and handy tips that can make repairing your air mattress easier and more efficient. Let’s explore some of these creative ideas:
- Using Flex Seal for Air Mattress Repair: Flex Seal is a popular rubberized coating that can seal, coat, and stop leaks fast. It’s a versatile product that can be used for temporary or semi-permanent air mattress repairs. To use Flex Seal, spray it over the hole and allow it to dry. It’s essential to apply it in a well-ventilated area and follow the product’s instructions for the best results.
- DIY Tips for Small Holes: Super glue or a hot glue gun can be surprisingly practical for tiny punctures. Apply a small amount over the hole and let it dry completely. These quick fixes may not be as durable as traditional patches but can be significant in a pinch.
- Reinforcing Patches: To give extra strength to your patch, consider placing a piece of fabric or a second patch over the first. This double-layer approach can reinforce the area, especially if the hole is in a high-stress part of the mattress, like the seams.
- Preventative Measures: One of the best tips is to prevent holes before they happen. Use a mattress cover or place the air mattress on a smooth surface free of sharp objects. Regularly inspecting and gently cleaning your mattress can also extend its life.
- Storage Tips: Store your air mattress in a cool, dry place when not in use. Avoid folding it too tightly, as this can create creases prone to cracking and holes.
Recommended Solution: Tear-Aid Repair Patch Kit (Type A)
The Tear-Aid Type A kit features clear, heavy-duty, airtight patches that stick instantly to vinyl and PVC surfaces, ensuring a permanent and flexible fix for your airbed without messy liquid glues.
Preventing Future Damage
 Taking proactive steps to prevent future damage to your air mattress is just as important as knowing how to fix it. Proper care and maintenance can significantly extend the life of your mattress, saving you time and money in the long run. Here are some tips to help you keep your air mattress in top condition:
- Proper Inflation: Avoid over-inflating your air mattress. Excessive air pressure can strain the seams and material, leading to tears and leaks. Follow the manufacturer’s guidelines for optimal inflation levels.
- Ideal Placement: Always place your air mattress on a smooth, flat surface. Rough or uneven surfaces with sharp objects can cause punctures. Consider using a protective layer or mattress cover for additional safety.
- Regular Inspection: Periodically check your air mattress for signs of wear and tear, especially before and after use. Pay close attention to seams and valves, as these are common areas for leaks.
- Gentile Cleaning: Clean your air mattress by wiping it down with a mild soap solution and a soft cloth. Avoid using harsh chemicals or abrasive materials that can damage the surface.
- Proper Storage: Deflate your air mattress entirely and fold it loosely when not used. Store it in a cool, dry place, away from direct sunlight and sharp objects. This helps prevent material degradation and folding stress.
- Weight Limit Adherence: Be mindful of the weight limit specified by the manufacturer. Overloading the mattress can lead to seam ruptures and material stretching.
Expert Opinion and Feedback
Having explored various aspects of repairing and maintaining air mattresses, I’d like to share some personal insights and feedback based on my experience. This expert opinion aims to give you additional confidence in handling air mattress repairs and upkeep.
Key Takeaways for Airbed Longevity
- Importance of Quality Repair Kits: In my experience, investing in a high-quality repair kit is crucial. While DIY solutions can be effective for temporary fixes, a good quality patch kit for air mattresses offers a more durable and reliable repair.
- Flex Seal as a Solution: Regarding the use of Flex Seal, it is a practical temporary solution for small punctures. However, traditional patch kits usually provide a longer-lasting fix for more giant tears or frequent use.
- Preventive Care is Key: One of the best strategies for air mattress longevity is proactive care. Regular inspections, proper inflation, and careful handling can prevent many common issues. Remember, prevention is always better than repair.
- Value of Patience in Repair: Patience plays a vital role in the repair process. Giving enough time for the adhesive to set and avoiding rushing through the steps can make a significant difference in the success of your repair.
- Continuous Learning and Adaptation: As with any DIY task, there’s always a learning curve. Each repair can teach you something new about your air mattress and how to better care for it. Embrace these experiences as opportunities to improve your DIY skills.
In conclusion, while air mattress repairs seem daunting initially, they are manageable with the right tools and a bit of know-how. By following the steps outlined in this guide and adopting a proactive approach to care and maintenance, you can significantly extend the life of your air mattress.
Conclusion
As we wrap up our comprehensive guide on “Quick and Easy Fixes for a Hole in Your Air Mattress,” it’s clear that repairing an air mattress can be a straightforward and rewarding DIY task with the right approach and tools. From identifying the hole to applying the perfect patch, each step contributes to restoring your air mattress to its full functionality.
We’ve explored various patching methods, from traditional patch kits to innovative solutions like Flex Seal, and provided practical tips for both the repair process and preventive care. Remember, the key to a successful repair lies in careful preparation, patience, and attention to detail.
Moreover, by adopting regular maintenance practices and being mindful of how you use and store your air mattress, you can prevent future damage and enjoy a comfortable, leak-free experience for years.
We hope this guide has been informative and empowering, giving you the confidence to tackle air mattress repairs easily. Remember, every repair is an opportunity to extend the life of your mattress and ensure a good night’s sleep, no matter where you are.
Thank you for joining us on this DIY journey. Happy repairing, and sweet dreams on your revitalized air mattress!

Expert in the world of air mattresses and outdoor sleep solutions, with years of experience testing and reviewing products to ensure comfort and durability. My passion is to help people make the best choices for their sleep comfort, whether for camping adventures or overnight guests.